Install a Basic Production Deployment on RHEL or Amazon Linux
On this page
Note
For an evaluation tutorial that involves only a single server, see Install a Simple Test Ops Manager Installation.
Overview
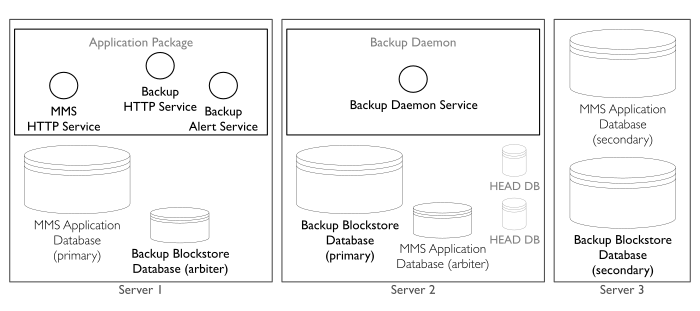
This tutorial installs the minimally viable Ops Manager deployment to servers that run either RHEL 6+ or Amazon Linux. The deployment provides full functionality for monitoring and automating your MongoDB deployments and optionally provides functionality to back up your deployments.
The deployment uses three servers. The Ops Manager Application runs on the first server, and the Backup Daemon runs on the second. The Ops Manager Application Database and optional backup-database run as three-member replica sets, each with two data-bearing members and an arbiter spread across the three servers.
The replica sets provide durability in case of failure by storing redundant copies of your application data and snapshots. However, the deployment does not provide high availability and cannot continue to accept writes if a backing database loses a replica set member.
The tutorial prepares the deployment’s servers, installs the Ops Manager Application Database and Backup Database, and then installs the Ops Manager Application and Backup Daemon. To install Ops Manager using a different configuration or operating system, see Example Installation Diagrams.
The following diagram shows the basic deployment.
Prerequisites
Required System Configurations
All servers that host MongoDB instances must meet the system configurations in the MongoDB Production Notes. This includes the server hosting the Backup Daemon.
Warning
Failure to configure servers according to the MongoDB Production Notes can lead to production failure.
Hardware Requirements
Your Ops Manager and MongoDB servers must meet the Hardware Requirements described on the Ops Manager Hardware and Software Requirements page. When a server hosts multiple components, you must sum the requirements for each component to determine the requirements for the server.
A basic deployment that can monitor up to 400 hosts has the following requirements:
| Server | RAM | Storage Capacity |
|---|---|---|
| Server 1, which runs the Ops Manager Application, the Primary for the Ops Manager Application database, and the Arbiter for the Backup Blockstore. | 23 GB | 200 GB |
| Server 2, which runs the Backup Daemon, the Primary for the Backup Blockstore, and the Arbiter for the Ops Manager Application database. | 15 GB for the Backup Daemon plus 8 GB for every 1 TB of the Backup Blockstore database. | Contact your MongoDB account manager. |
| Server 3, which runs the secondaries for the Ops Manager Application and Backup Blockstore databases. | 8 GB for the Ops Manager Application database plus 8 GB for every 1 TB of the Backup Blockstore database. | 200 GB for the Ops Manager Application database. Contact your MongoDB account manager for requirements for the Backup Blockstore database. |
Permissions and Networking Requirements
You must have root access on the machines you are provisioning.
If you install on AWS servers, you must have at least one EC2 security group configured with the following inbound rules:
- An SSH rule on the
sshport, usually port22, that allows traffic from all IPs. This is to provide administrative access. - A custom TCP rule that allows connection on ports
8080and8081on the server that runs the Ops Manager Application. This lets users connect to Ops Manager. - A custom TCP rule that allows traffic on all MongoDB ports from any member
of the security group. This allows communication between the various Ops Manager
components. MongoDB usually uses ports between
27000and28000.
Procedures
Prepare Each Server
Set up servers that meet the hardware requirements for deployments that monitor up to 400 hosts. If your deployment will monitor more than 400 hosts, use the requirements on the Ops Manager Hardware and Software Requirements page instead.
Increase each server’s default ulimit settings.
If you are installing to RHEL, check whether the
/etc/security/limits.d directory contains
the 90-nproc.conf file. If the file exists, remove it. (The
90-nproc.conf file overrides limits.conf.) Issue the following
command to remove the file:
For more information, see UNIX ulimit Settings in the MongoDB manual.
Install MongoDB on each server.
First, set up a repository definition by issuing the following command:
Second, install MongoDB by issuing the following command:
Deploy the Ops Manager Application Database
Install the Ops Manager Application Database as a three-member replica set, as shown in the deployment diagram.
Create a data directory on each server.
The Ops Manager Application Database uses server 1 for the primary,
server 2 for the arbiter, and server 3 for the secondary.
Create a data directory on each server and set mongod as the
directory’s owner. For example:
Start each MongoDB instance.
For each replica set member, start the mongod daemon and specify
“mongod” as the user. Start each instance on its own dedicated port number
and with the data directory you created in the previous step. Specify the
same replica set for all three members.
The following command starts a MongoDB instance as part of a
replica set named appdb and specifies the /data/appdb
data directory.
After you complete this step, you should have mongod instances running on server1, server2, and server3.
Connect to the MongoDB instance that will host the database’s primary.
Connect to the MongoDB instance running on server 1, which is the
server that hosts the Ops Manager Application database’s primary. For example, the
following command connects on port 27017 to a MongoDB instance running
on mongodb1.example.net:
Once you are connected, your command prompt changes to >.
Initiate the replica set.
Issue the following command, which returns 1 when the replica set
successfully initiates:
MongoDB returns 1 and creates a replica set with the current member
as the initial member. The command prompt displays the current state of
the member. When the member becomes primary, prompt displays
PRIMARY>.
Add the remaining members to the replica set.
Add the mongod instances running on server 3 and server
2 as a secondary and an arbiter, respectively. Add the secondary first.
For example, the following two commands add MongoDB instances running on
mongodb3.example.net and on mongodb2.example.net:
Verify the replica set configuration.
To verify that the configuration includes the three members, issue rs.conf():
The method returns output similiar to the following.
Optionally, connect to the MongoDB instances running on the other two
servers and verify that server 3 has the SECONDARY> prompt and
server 2 has the ARBITER> prompt.
For more information on deploying replica sets, see Deploy a Replica Set in the MongoDB manual.
Deploy the Backup Blockstore Database (Optional)
If you intend to use Ops Manager Backup, deploy the Backup Blockstore database as a three-member replica set, as shown in the deployment diagram.
Create a data directory on each server.
The Backup Blockstore database
uses server 1 for the arbiter, server 2 for the primary, and
server 3 for the secondary. Create a data directory on each server
and set mongod as the directory’s owner. For example:
Start each MongoDB instance.
For each replica set member, start the mongod daemon and specify
“mongod” as the user. Start each instance on its own dedicated port number
and with the data directory you created in the previous step. Use a
different port number from the port used for the MongoDB instance
hosting the Ops Manager Application database. Specify the same replica set for all
three members.
The following command starts a MongoDB instance as part of a
replica set named blockstore, specifies the /data/blockstore
data directory, and uses port 27018:
After you complete this step, you should have new mongod instances running on server1, server2, and server3.
Connect to the MongoDB instance that will host the database’s primary.
Connect to the MongoDB instance running on server 2, which is the server that hosts the Backup Blockstore’s primary. Make sure to connect on the correct port number for the MongoDB instance that hosts the Backup Blockstore.
For example, the following command connects on port 27018 to a MongoDB
instance running on mongodb2.example.net:
Once you are connected, your command prompt changes to >.
Initiate the replica set.
Issue the following command, which returns 1 when the replica set
successfully initiates:
MongoDB returns 1 and creates a replica set with the current member
as the initial member. The command prompt displays the current state of
the member. When the member becomes primary, prompt displays
PRIMARY>.
Add the remaining members to the replica set.
Add the mongod instances running on server 3 and server
1 as a secondary and an arbiter, respectively. Add the secondary first.
For example, the following two commands add MongoDB instances running on
mongodb3.example.net and on mongodb1.example.net:
Verify the replica set configuration.
To verify that the configuration includes the three members, issue rs.conf():
The method returns output similiar to the following.
Optionally, connect to the MongoDB instances running on port 27018
on the other two servers and verify that server 3 has the
SECONDARY> prompt and server 1 has the ARBITER> prompt.
For more information on deploying replica sets, see Deploy a Replica Set in the MongoDB manual.
Install the Ops Manager Application
Install the Ops Manager Application on server 1. The Ops Manager Application and Ops Manager Application database together provide full monitoring and automation functionality.
Download the Ops Manager Application package.
On server 1, download the latest version of the Ops Manager Application
package by issuing curl -OL with the URL for the latest version. If
the server 1 does not have Internet access, download the package to
another server and scp it to server 1.
To download the Ops Manager Application package:
In a browser, go to http://www.mongodb.com/download.
Submit the subscription form.
On the MongoDB Enterprise Downloads page, go to the MongoDB Ops Manager section and click the here link.
On the Ops Manager Download page, acknowledge the recommendation to contact MongoDB for production installs.
On the MongoDB Ops Manager Downloads page, copy the link address of the “Monitoring, Automation and Core” RPM link.
Open a system prompt.
Download the Ops Manager Application package by issuing a
curlcommand that uses the copied link address:The downloaded package is named
mongodb-mms-<version>.x86_64.rpm, where<version>is replaced by the version number.
Install the Ops Manager Application package.
Issue rpm --install with root privileges and specify the name of the
downloaded package:
Configure the Ops Manager Application.
Open the /opt/mongodb/mms/conf/conf-mms.properties file with root
privileges and set values for the options described in this step. For
detailed information on each option, see the Ops Manager Configuration Files
page.
Set mms.centralUrl and mms.backupCentralUrl as
follows, where <ip_address> is the IP address of the server running
the Ops Manager Application.
Set the following Email Address Settings as appropriate. Each may be the same or different.
Set the mongo.mongoUri option to the servers and ports
hosting the Ops Manager Application database. For example:
If, and only if, your automated MongoDB deployments will not have access to the internet, set Automation Versions Settings. You also must configure Ops Manager for access to MongoDB binaries, as described in Configure Local Mode if Ops Manager has No Internet Access.
Start the Ops Manager Application.
Issue the following command:
Open the Ops Manager home page.
The first user created for Ops Manager is automatically assigned the Global Owner role.
Enter the following URL in a browser, where <ip_address> is the
IP address of the server:
Click the Register link and follow the prompts to register the new Global Owner user and create the first group. When you finish, you are logged into the Ops Manager Application as the new user.
Install the Backup Daemon (Optional)
If you will use Ops Manager Backup, install the Backup Daemon on server 2.
For production, the Backup Daemon should always reside on a separate physical server from the Ops Manager Application and from any databases being monitored and/or backed up.
Download the Backup Daemon package.
On server 2, download the latest version of the Backup Daemon
package by issuing curl -OL with the URL for the latest version. If
the server 2 does not have Internet access, download the package to
another server and scp it to server 2.
To download the Backup Daemon package:
In a browser, go to http://www.mongodb.com/download.
Submit the subscription form.
On the MongoDB Enterprise Downloads page, go to the MongoDB Ops Manager section and click the here link.
On the Ops Manager Download page, acknowledge the recommendation to contact MongoDB for production installs.
On the MongoDB Ops Manager Downloads page, copy the link address of the “Backup” RPM link.
Open a system prompt.
Download the Backup Daemon package by issuing a
curlcommand that uses the copied link address:The downloaded package is named
mongodb-mms-backup-daemon-<version>.x86_64.rpm, where<version>is replaced by the version number.
Install the Backup Daemon package.
Issue rpm --install with root privileges and specify the name of the
downloaded package:
The software is installed to /opt/mongodb/mms-backup-daemon.
Point the Backup Daemon to the Ops Manager Application database.
Open the /opt/mongodb/mms-backup-daemon/conf/conf-daemon.properties file
with root privileges and set the mongo.mongoUri value to the
servers and ports hosting the Ops Manager Application database. For example:
Use scp to copy the gen.key file from the Ops Manager Application server, server 1.
Use scp to copy the /etc/mongodb-mms/gen.key from the Ops Manager Application
server to the /etc/mongodb-mms directory on the Backup
Daemon server, server 2.
For example, if you are running the command from the Ops Manager Application server:
Note
If it is inconvenient to use scp to copy gen.key, you may
encode the file and copy its contents, provided you have a graphical
user interface with terminals open to both server 1 and server
2. As gen.key is a binary file, you must first encode the file
into text via base64. On the console connected to server 1,
type:
sudo base64 /etc/mongodb-mms/gen.key
The command encodes the text and prints it to the terminal. For example:
/LETVVl9rA1aFsY7masSLYJmlKValKbu
Copy it to your clipboard. Then, on the console connected to server
2, enter the following, replacing <encoded-text> by pasting in
the copied text:
echo "<encoded-text>" > gen.key.txt
On server 2, issue the following to convert the key back into
binary and save it as /etc/mongodb-mms/gen.key:
sudo base64 -d gen.key.txt > /etc/mongodb-mms/gen.key
Check that the key was converted properly by issuing the following
sum command on both server 1 and server 2 and ensuring
that the outputs match:
sum /etc/mongodb-mms/gen.key
Once you have verified /etc/mongodb-mms/gen.key on server 2,
issue the following to remove the temporary file:
rm gen.key.txt
Set permissions and ownership of the gen.key file on the Backup Daemon server, server 2.
Once you have copied gen.key to server 2, ensure that the file’s
permissions are set to 600 and that the owner and group are both set
to mongodb-mms. If they are not, issue the following:
Start the Backup Daemon.
Issue the following command on server 2:
If you run into any problems, the log files are at <install_dir>/logs.
Open Ops Manager and access the Backup configuration page.
Open the Ops Manager home page and log in as the user you first registered when installing the Ops Manager Application. (This user is the global owner.) Then click the Admin link at the top right of the page. Then click the Backup tab.
Enter configuration information for the Backup database.
Enter the configuration information described below, and then click Save. Ops Manager uses this information to create the connection string URI used to connect to the database.
<hostname>:<port>: Enter a comma-separated list of the fully qualified domain names and port numbers for all replica set members for the Backup database.
MongoDD Auth Username and MongoDB Auth Password: Enter the user credentials if the database uses authentication.
Encrypted Credentials: Check this if the user credentials use
the Ops Manager credentialstool. For more information, see
Encrypt MongoDB User Credentials.
Use SSL: Check this if the MongoDB database uses SSL. If you select this, you must configure SSL settings for both the Ops Manager Application and Backup Daemon. See Ops Manager Configuration Files.
Connection Options: To add additional connection options, enter them using the MongoDB Connection String URI Format.
Next Steps
To set up a replica set for a test environment, see Test Ops Manager Monitoring. The tutorial populates the replica set with test data, registers a user, and installs the Monitoring and Backup Agents on a client machine in order to monitor the test replica set.